Preface

The release of the EaaSI beta is an opportunity for the project team to learn about the EaaSI Network functionality in action. As environments are created and shared, we expect to uncover bugs in the software and challenges running a distributed network framework. But before we get to this point, the nodes must first install the software. The beta release is also serving as an opportunity to test deployment procedures for user-friendliness and ease-of-use. We want deployment to run as smoothly as possible, but the unique technological infrastructure of different institutions means that no two deployments are alike. The beta period is a perfect opportunity to identify these various challenges so we can continue to improve and simplify EaaSI’s installation process.

The project team is extremely grateful for the time and effort each node’s sys admin representatives have provided to this process. Our “Tech Talk” email list has been abuzz with valuable bug reports and discussions of the deployment process. In the post that follows, Mark Suhovecky (Data Curation Developer, Notre Dame) provides one node’s experience with the deployment process. As you will see, this is not a straightforward process, but with Mark’s patience and diligence, the software is now installed and ready for testing. We can’t wait to see what happens next.

EaaSI in AWS or Bust​
Requirements
  1. Both the Build and EaaSI Test servers need to be AWS-hosted. Our University is nearing the end of a 5-year effort to migrate campus IT services from hardware run in our own data centers to the Cloud-based applications.
  2. The build server requires is accessible only from campus.
  3. The EaaSI server requires a static public IP, with HTTP, HTTPS, and SSH ports (for the beta duration) open to the world.
  4. The whole provisioning and deployment process needs to be scripted
  5. The EaaSI server needs adequate computing and disk resources.
Building the AWS Parts

The build and EaaSI servers, in AWS parlance, are Amazon Elastic Compute Cloud Instances (EC2 for short). They can be sized and configured in many ways. I choose a t3.micro for the build server, and a t2.2xlarge for the EaaSI server. The sizes are detailed here. This gives us an EaaSI server with 8 cores and 32G memory. We’ll see how that performs.

To keep the same IP address, even if the server is stopped, we need what AWS calls an Elastic IP. So I got one:

Screenshot of successful Elastic IP allocation in the Amazon Web Services console

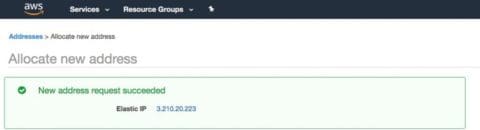
AWS assigned this the unappetizing name of ec2-3-210-20-223.compute-1.amazonaws.com.
I asked my network administrator to make a CNAME with something more palatable:

Screenshot of a terminal window displaying the human-readable alias (eaasitest.library.nd.edu) for the EC2 machine provisioned for EaaSI deployment

To expose the Beta EaaSI Server to the world, I created an AWS network security group to open ports 80, 443, and 22 (this, rather than iptables, is how firewalls are managed). A more restrictive security group limits the build server to ssh access from campus.

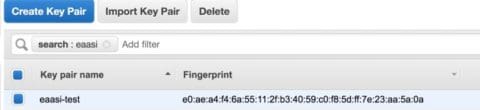
I let AWS create and manage a Public/Private SSH keypair. It automatically adds the public pair to each of my EC2 instances when they are created.

Screenshot of the Public/Private SSH keypair for the Amazon EC2 instance provisioned for EaaSI deployment
Putting the AWS Parts Together

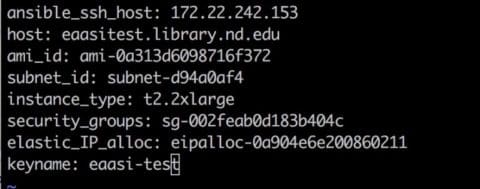
With all of the parts created, the EaaSI server we want can be described as these AWS resources:

Screenshot of terminal window with all AWS resources for EaaSI deployment listed as key-value pairs

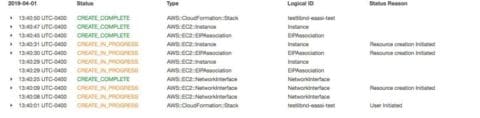
We can now use an AWS service called CloudFormation, which takes a YAML file of these attributes, and builds an AWS “Stack” which instantiates our two EC2 instances. From the AWS console, that looks like this:

Screenshot of Amazon Cloud Formation in action – building the EaaSI “stack”
Deploying EaaSI

I scripted my EaaSI installation, including the CloudFormation steps, in Ansible. The code is viewable here:

https://github.com/ndlib/eaasi-blueprints

With this in place, standing up EaaSI in our environment goes like this:

  1. ansible-playbook create-eaasibuild.yml creates the t3.micro build EC2 instance using Cloud Formation.
  2. ansible-playbook create-eaasihost.yml creates the t2.2xlarge Ubuntu EC2 EaaSI Test host.
  3. ansible-playbook deploy-eaasi.yml uses the build server to run the steps listed in the install document https://openslx.gitlab.io/EAASI-docs/install/setup.html with the AWS eaasi-test key used as the admin key.
It’s Messy Behind the Curtain

Of course there are bugs!

As of this writing,

  • I am still working on adding a separate EBS storage volume to the EaaSI server for all of those emulation images, until S3 storage is an option.
  • It would be nice if the ansible configuration were parameterized. I am copying the private key from my local machine during the install- it will have to go into AWS Parameter Store before this can move into our production AWS environment.

I must thank Tom Hanstra in the Enterprise Systems Unit here in the library for his help figuring out AWS Cloud Formation.

Any questions or comments may be directed to me at suhovecky[at]nd[dot]edu

Preferred citation:

Suhovecky, Mark. (2019, April 9). Beta Deployment: EaaSI in AWS or Bust!. Software Preservation Network. https://www.softwarepreservationnetwork.org/beta-deployment-eaasi-in-aws-or-bust/